Wednesday 29 April 2020

Blooming paper flowers


Hello everyone! Today's activity is the perfect indoor activity, especially if you are in the UK as the weather is not so nice. These paper flowers that bloom when they touch water are very simple, but your children will think it is magic! If you are homeschooling your children at the moment and want to incorporate this into learning, it makes a great activity to teach about growth and life cycles.

What you will need:
- paper 
- scissors 
- colouring pens/pencils
- bowl/tub of water

1. To start this activity, draw out your shape on a piece of paper. I found flowers work the best, but I also used a butterfly shape. If you don't want to draw your own template, I have included a link to some below.

2. Once you have drawn your shape, colour it in and cut it out.*

3. The last step, before you put your flower into the water, is to fold in the petals as I have shown in image 4. Make sure to not fold them down too tightly as they might not bloom when they are put in the water.

4. Finally, place your folded up shape into the water and watch as it starts to unfold!

Extra Suggestion:

- You could layer two flowers together to watch something bigger unfold. To do this simply cut out two flowers, one bigger than the other. Stick the middle of the smaller flower onto the bigger flower and then place onto the water.

(* = adult help/supervision might be needed for that particular task).


Monday 27 April 2020

Magazine Faces


Today's activity is a fun and easy game for children to mix and match the different features of faces from magazines to create a funny face! I also like this activity as if you choose not to glue them down then you can use this game again and again.

What you will need:
- an old magazine 
- scissors
- glue stick (optional)
- piece of paper (optional)

1. Firstly, cut out different faces from your magazine. I think it is fun to cut out different sized images so that the faces are even more mixed and matched! Once you have cut out the whole face, cut out the different features like the eyes, nose and mouth.*

2. Separate the different features that you have cut out and create new faces using the different eyes, mouth and nose.

3. You can glue these down once you are happy with how the face is or just place them down so that you can re-use them another time. 

Extra suggestion:

- If you want to re-use this game but want the faces to stick to the page, you could use blue tac to temporarily stick them on. 

- I have just created faces from my magazine, but you could also cut out arms and legs to create a whole person or cut out different outfits to make it a fashion game.

- For older children you can adapt this to make a 'beetle drive' type game. Number each feature from 1-6, take turns to throw the dice to build up your picture.

* = Adult supervision needed for this task


Friday 24 April 2020

Colour scavenger hunt


Today's activity is fun for all ages, but it is great for younger ones to practise their colours. You can use my template or make your own and if you want a bit of a challenge you could use a variety of colours and shades and try and find objects to match! 

What you will need:
- If you are making your own template, you will need some felt tips or colouring pencils and a piece of paper.

1. First of all, if you are making your own template, colour in squares/patches onto your paper.

2. Find objects to match all of your colours. I chose 6 to colours to match items to and I used items only from the garden, but you could also do this inside if the weather is not so good!

Extra suggestion:

- Similar to what I have done, you could challenge yourself to only find flowers and leaves. 

-Following the theme of rainbows which have been a popular thing to display at the moment, you could create a rainbow out of the items you have found!

- For younger children, you could use an empty cardboard egg box, put the colour where the egg would sit and then collect the item to put in each section of the box.


My template:


Wednesday 22 April 2020

Frozen Excavation


This activity is simple, but keeps little ones busy for a good amount of time! As you can see from the first image this activity has been tried and tested many times when I worked for a family in the summer. It was a winner for the younger children and is great for practising fine motor skills and patience as some of the characters are harder to get out than others!

What you will need:
- plastic container filled with water
- toy characters (lego people, dinosaurs, playmobil all work well for this activity - anything that will not rust, or harm being placed in water)
- kitchen utensils - spoons, fork, etc

1. First of all, find some characters that you want to rescue from the ice and place them into a container filled with water.

2. I filled the container about half full so that the characters were not too difficult to get out. Place your lid onto the container and put in the freezer until it has completely frozen. It might be a good idea to prepare this the night before and put the container in the freezer overnight so it is ready for the next day.

3. Once it has completely frozen take the container out of the freezer and remove the ice by flipping it upside down.

4. If it is a nice day, take the ice outside and using the utensils try and rescue the characters. If it is too tricky for younger children, then you can let some of the ice melt first in the sun.

Extra suggestion:

- If you have dinosaurs, you could try and rescue them from a frozen egg. To do this put the dinosaur inside a balloon and fill the balloon with water. Place this in the freezer, remove the balloon and you will have an egg shape!

Monday 20 April 2020

Tin can wind chime


Today's activity is making this wind chime using old tin cans. You can decorate yours however you like. Make sure to hang them up outside as they make a great noise in the wind!

What you will need:
- 3+ tin cans
- string 
- scissors 
- something to make a hole in the can * (I used a screwdriver)
- paint + paintbrush or marker pens 

1. First of all, find some cans and wash them out.* (Be careful the edges of the cans might be sharp). I would use more than 2 cans if you are able to find them as it makes a better noise. Make sure the lids have been taken off and also the labels.

2. Once you have done that, you will need an adult to help with the next task which is to poke a hole through the bottom of the can.* 

3. Feed some string through the hole and tie a few knots to keep the can in place. Repeat with all of your cans making sure you use the same length of string for each one.

4. Now you can decorate! I have used paint to do some patterns around it, but you could paint the whole can or even use marker pens to decorate.

5. Finally, find somewhere to hang them up outside. I tied mine onto a tree in the garden. 

Extra suggestion:

- To make a louder wind chime you can use other objects to add to your wind chime. Cutlery and plastic bottles might also work well.

* = Adult supervision/help might be needed for this task.


Friday 17 April 2020

Bubble Snakes


While the weather is still so nice, today's activity is an outdoor one and is really easy to make! This is also made using recycled items so no need to buy anything new.

What you will need: 
- plastic water bottle 
- 1 sock (if you did the sock bunny last week and saved the matching sock, use it for this activity)
- scissors 
- elastic band or hair tie 
- washing up liquid 
- bucket or bowl for water

1.  For the first step, you might need some help from an adult to cut the bottom of the water bottle off.* You can save the bottom part of the bottle to make as a bird feeder or if you haven't yet made the fairy garden from my blog, you could use it to make the pond! 

2.  Place the sock over the bottom half of the bottle, making sure it is pulled over tight. 

3.  To keep the sock from sliding off, use an elastic band or hair tie around the sock to keep it in place. 

4.  Fill up your bowl 3 parts water and 1 part washing up liquid. 

5.  Now to make these amazing bubble snakes, take off the cap at the top of the bottle, dip the bottom half of the bottle into the soapy mixture and then take it out and blow out through the top.

Extra suggestion:

- If you have some food colouring, you can make some rainbow bubble snakes, and even create some art from it! 

To do this, put dabs of food colouring onto the part of the sock that is submerged in the water. Blow the bubble snakes onto some paper and leave it until all of the bubbles have popped. It should leave you with a colourful bubble print pattern.


*  =  Adult supervision or help might be needed for this task!

Wednesday 15 April 2020

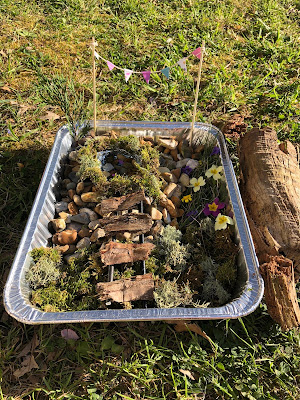
Fairy Garden


This is another great activity to use what is around you in the garden or to collect things when you next go on a walk. I have put some instructions on how I have created this, but this is especially fun as you can design yours however you like!

What you will need:
- a tray (a plate, plant pot will also work)
- moss/grass/leaves
- stones/pebbles/tree bark
- flowers to decorate
- tin foil
- blue food colouring (optional)
- 2 skewers or sticks 
- string
- scissors
- glue stick
- coloured paper (or plain paper if you want to design your own bunting)

1. Before we can begin making the garden, firstly you will need to collect together the items you are going to put in your tray. Once you have done this, start filling out the base of the tray. I filled half of it with moss, a quarter of it with stones and another quarter with my pond and grass.

2. If you would like to make a pond, leave a space for this in the garden when filling up the base of the tray. To make the pond, I used tin foil and moulded the shape of a pond by wrapping the tin foil around a dish. Make sure to add a few layers of foil so that the water does not leak! 

3. Place your pond in the garden and fill the base of the pond with stones to weigh it down and then some water. I added some food colouring to the water to make it stand out better!

4. Now you can start to add the more decorative details like the path and the bunting. To make the path, I put 4 pieces of bark onto 2 straws to create a bridge. To make a path, pebbles, stones or bark work especially well. 

5. To make the bunting, cut two skewers or sticks the same size.* Now tie string at the top of each end of the skewer/stick. To make the flags, draw triangles back to back on some paper (see image 6). Cut these out,* glue the back and attach to the string by folding each side over the string and sticking together.

6. Finally, place the bunting into your tray and add the final details to your garden. These can be flowers to decorate it with and also some fish for the pond. (Use some more of your coloured card to make the fish).

And there you have it, the perfect garden for the fairies to come and visit and play! 

Extra suggestion:
- If you are feeling even more creative, have a go at making this swing to go in the garden!
- You can make this with a lego tyre, some string, some skewers, or lollipop sticks and some blue tack.
-Create a frame by making two triangles with the skewers, place another skewer across them and blue tack them together. Now tie on the tyre with some string, and there you have it, the perfect fairy swing!


*  =   Parental supervision/help might be needed for this task!


Monday 13 April 2020

Butterfly squish art


Today's activity is another colourful one and is really simple to make! Use your own template or the one I have linked below to create this bright butterfly :)

What you will need:
- paper or card
- pencil
- scissors 
- paint 

1. Firstly, you will need to draw and cut out your template.* You can use the one that I have linked and print it out, or get creative and draw your own one! If you are drawing your own, draw only one side of the butterfly, fold the paper in half and cut it out. This will make the butterfly symmetrical.

2. Once you have cut out your butterfly, put some old newspaper or magazines underneath the butterfly to make sure that there are no paint spillages. Dab the paint as messy or neat as you like over one wing of the butterfly. You can put a fair amount of paint on the wing as you want to make sure that when you fold it over, it transfers onto the other wing.

3. Now you have painted one side, fold the wing over so it sticks to the other wing and transfers the paint. Press down and then fold back over the wing. You should have a symmetrical pattern on both wings.

4. Leave to dry and hang up as a decoration or give it to someone as a present!


Extra suggestion:
- paint both sides of the butterfly, and hang up from the ceiling with some string to create a lovely mobile.
- fold the butterfly in half and write on the inside to make a card for someone.

*  =  Parental supervision needed for this task 

Friday 10 April 2020

Sock Bunnies


Happy Easter! Today's activity is making a sock bunny. It makes an adorable Easter decoration and does not require lots of things to make it!

What you will need:
- string/twine 
- 1 sock 
- a marker pen 
- filling for the sock, I have used rice, but I understand there is a bit of a shortage of rice at the moment! Other alternatives that work just as well are newspaper, old tights/fabric scraps, dried beans/pulses etc.
- ribbon/buttons and craft glue (optional)
- scissors (sharp enough to cut through fabric)*

1. First of all you want to fill the sock with your filling to about half way and tie off the top with your string.

2. Now, use another piece of string to tie off around the middle to create the head and body. It should look something like the 3rd image.

3. To create the ears, cut off the band that is at the top of the sock and then cut in a straight line from the top of the sock until you reach the string at the top of the head. If the ears are looking a bit square, cut a curve in the edges so that they look more rabbit like!*

4. If you have ribbon, tie it between the head and body covering the string. If you have some buttons, glue them onto the face* (and if you haven't got any buttons draw some little dots for the eyes). Finally draw on the rabbit's mouth.

*  = parental supervision needed for this task

Extra suggestion:
- If you want to add a bunny tail like I have done in the image below, I'll include the link which explains how to make pompoms.


Wednesday 8 April 2020

Easter Nests


As it is coming up to Easter, this activity is inspired by spring! This is an easy and quick activity that doesn't even need to cook in the oven, and more importantly they taste yummy too. :)

What you will need:
- 200g chocolate 
- 70g cereal (cornflakes, shredded wheat and rice krispies will all work well)
- 60g unsalted butter
- 2 tbs golden or maple syrup
- mini eggs (or any other chocolate eggs)
- cupcake cases 

1. First of all, weigh out your ingredients and place your butter and chocolate in a bowl to melt. You can either melt them in the microwave* or you can use the 'Bain-Marie' method, which is what I have done, (where you melt the mixture in a bowl over a pan of hot water).*

2. Once your mixture has melted, take it off the heat and add in your golden/maple syrup.

3. Now it's time to add the cereal! Pour it in slowly and stir well.

4. Once all of your ingredients have been incorporated and mixed well, spoon your mixture into cupcake cases in a baking tray, spread out evenly.

5. Finally, add your chocolate eggs into the middle of your nests and place your tray into the fridge for 2 hours. 

6. Enjoy! :)

* = parental supervision or help needed for this task.

Extra suggestion:
- Why not make this part of a garden picnic (or an indoor picnic) using a blanket and your favourite teddies to celebrate the Easter weekend!


Monday 6 April 2020

Flower Faces


 Happy Monday! Today's activity is simple and fun for all ages and all it requires is some leaves and flowers found in the garden.

What you will need:
- leaves, flowers and sticks from the garden (make sure to check with your parents which flowers you are allowed to pick!) 
- A4 paper
- scissors 
- PVA glue or glue stick

1. First of all, collect all of the plants you want to use for your image. As you have a look around, try and look for the different shaped features. For example, I knew for the eyes I needed to find an oval shape. This will make it easier when putting it together! 

2. If you want to create an outline/frame for the face, find sticks and place them down in the shape of the face.

3. Now with the plants that you have found for the main features of the face, place down inside the outline you have already created. If the plants don't fit how you want them to, you can always cut them to shape.*

4. Finally, place down the extra features like eyebrows, hair etc. Once you are happy with how it looks, glue down all of the features. You can also leave it not glued so that you can mix and match the features of the face if you wish to.

Extra Suggestion:
- If you would like to create more of these faces, have a go at creating something inspired by a person. I have attempted to create the artist Frida Kahlo in the image below!

* = parental supervision needed for this task.

(After picking/handling plants, make sure to wash your hands) :)


Friday 3 April 2020

Chopstick bubbles

This is one of my favourite activities as it requires only a few items to make Amazingly big bubbles! 

What you will need:
- string  
- chopsticks (sticks from the garden or pencils will also work)
- washing up liquid 
- tray or large bucket of water

1. Firstly, you want to cut two pieces of string about 30cm long. 

2. Tie the ends of the first piece of string onto the two chopsticks (one end of the string on each chopstick). Then tie each end of the second piece of string near the bottom of each chopstick  (leaving enough room to be able to hold the chopsticks). Tie it round twice and nice and tight so it doesn't move out of place. You should have something that looks like the third picture in the grid above. 

3. Now fill up your tray with water. To get good bubbles you will need about three parts water to one part washing up liquid. 

4. Place your the string into the mixture and lift out slowly and you should see some bubbles! If there are no bubbles when you lift it out of the water, try adding some more washing up liquid.

Extra suggestion:
- If you want to create lots of smaller bubbles, try twisting your string into loops.
- To create even bigger bubbles try using pieces of bamboo instead of chopsticks, use rope instead of string and use a larger bucket to create enormous bubbles!


Wednesday 1 April 2020

Finding the alphabet in everyday things


This task only requires your imagination! As you can see I have created the whole alphabet using objects inside the house and items from the garden. For younger children this is a great activity to spark curiosity by finding items that look like the different letters and for older children the task can be made slightly more challenging by taking photos of the items and creating a collage like I have done above. 

What you will need:
- items from around the house
- a camera or iPad/phone camera (not essential)

This activity is quite self explanatory so I won't leave instructions, only some tips if you want to take photos and create a collage. 

- This is not essential, but I found the letters stood out better when edited into black and white.

- To create the collage I used the app Pic Collage, but you can use any free editing app or Microsoft Word. If you find there is a gap at the start and end of your collage, you can fill it with a blank tile or even find an object the shape of a heart, star etc to fill it.

If you are stuck and want some inspiration, here are the list of items that I used for my collage: kitchen tongs, CDs, mug handle, bananas, plant, gloves, charging cable, glasses, candle stick, rope, scissors, scrabble letters, tights, hole puncher, plug hole, shower head, tennis rackets, shoe laces, hoover pipe, wooden art mannequin, telephone wire, photo holder, wifi box antenna, floor tiles, bamboo and a lamp.

Extra suggestion:
- Once you have tried taking photos of the alphabet, have a go at writing your name or write a sentence.
-You can also print out your letters to make a physical collage that you can mix and match to create different words. :)


Paper tunnel crazy golf

It's Monday again and today's activity is this fun 'aiming' game. This is really simple to set up and only require...